
How to Install Pool Plumbing Lines
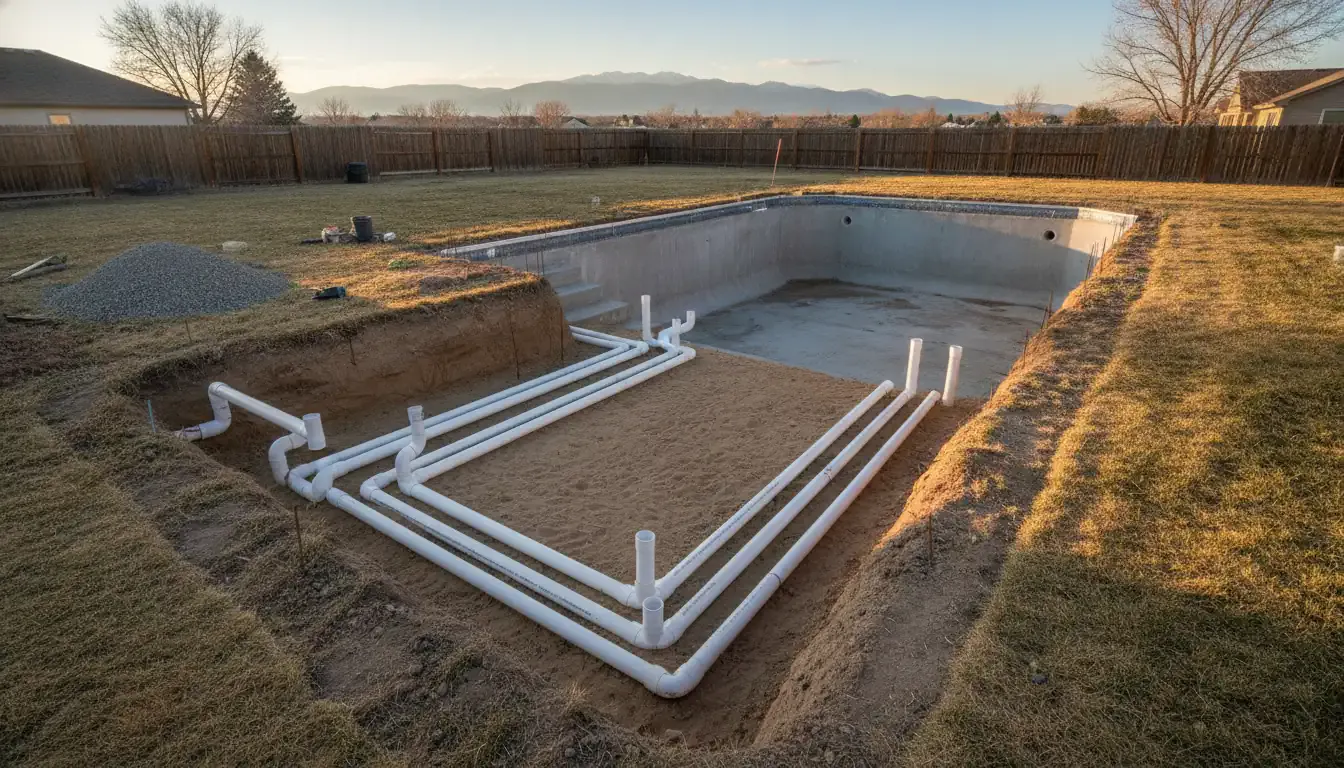
Learning how to install pool plumbing starts with the buried lines, not the equipment pad. Suction from the main drain and skimmer, and the returns that send filtered water back, have to hold pressure. Those lines also have to stay reachable for service and survive a Denver freeze season. Get the order wrong and the leak shows up only after the deck is poured.
This is the field sequence for those lines. Circulation planning, equipment-pad layout, freeze strategy, and the permit question list already live in the Denver pool plumbing installation planning guide. Read that before you dig. Use this page once the routes are chosen and you need the trench, the pipe, the test, and the backfill.
Call (303) 431-8501 to inspect the plumbing scope before you bury a line.
What you need before a shovel goes in
Have a written line list before anyone cuts trench. A typical residential loop needs a main-drain suction line, a separate skimmer suction line, and a return manifold that splits to each wall fitting. A spa, a cleaner, or a water feature gets its own run and its own valve. Sharing one pipe across those jobs is how a later repair shuts the whole pool down.
Mark every fitting on the shell before you dig. Returns usually sit in the upper wall so they push water across the surface. The main drain sits at the deepest point. Skimmer pipe leaves the skimmer body and runs to the pad on its own trench or a clearly separated path in a shared trench. If a fitting location is still a guess, stop. Moving a penetration after gunite or a liner is in place is a different project.
The City and County of Denver says a permanent residential pool needs zoning, sewer-use and drainage, and a building permit. Electrical, plumbing, mechanical, or boiler permits may also be required, depending on the work. Confirm which of those apply to this address before pipe goes in the ground. The remodel and rehab team can fold that plumbing scope into a larger shell or deck project so the lines are not an afterthought.
How to install pool plumbing in the trench
Dig the trench deep enough to clear the shell footing and the future deck. Then bed the pipe on sand or fine soil. Rock and construction debris under PVC create a point load that can crack a fitting months later. Keep suction and return pipes from crossing in a knot. Where they must cross, sleeve or separate them so one repair does not destroy the other line.
Rigid Schedule 40 PVC is the usual choice for buried pool lines and for the exposed piping at the equipment. Flexible PVC can snake through a tight shell, but the pad itself should still land on rigid pipe so valves and unions stay straight. Use primer and solvent cement rated for the pipe, and give each joint the cure time on the can before you test. Threaded fittings at the shell get thread sealant. Do not rely on glue alone on a threaded adapter.
Size is a flow decision, not a habit. Many residential skimmer and return runs are 1.5-inch. Many main-drain runs are 1.5-inch or 2-inch. The pump and the length of the run still decide the size. A long Denver side-yard trench with several hard bends needs fewer sharp turns, not a smaller pipe. Two 45-degree fittings move water with less friction than one hard 90. A tee that splits two returns should sit near the midpoint. Both fittings then see similar pressure.
| Line | What it does | Install note |
|---|---|---|
| Main drain suction. | Pulls water from the deepest point. | Keep it on its own valve at the pad so it can be isolated. |
| Skimmer suction. | Pulls surface water and debris. | Do not tee it into the main drain underground. |
| Returns. | Send filtered water back into the pool. | Split near the midpoint and avoid stacked 90s. |
| Cleaner or water feature. | Feeds a dedicated device. | Give it a separate line and a valve you can reach. |
Leave a straight stub at each shell fitting long enough to connect later without forcing a bend against the wall. Cap or plug every open end the same day so dirt cannot enter the line. A pebble in a suction pipe becomes a service call after the deck is finished.
Pressure test the lines before you backfill
Test every buried run while you can still see the joints. Plug the shell fittings, fill the pipes with water, and raise the pressure only to the level the pipe and fitting maker allows. Hold it and watch the gauge. A leak drops the needle quickly. A slow creep still means a joint, a plug, or a cracked fitting, not "close enough."
Walk the trench while the lines are under pressure. Look for weeps at tees, at threaded adapters, and anywhere the pipe was bent to make a corner. Mark failures, release the pressure, cut out the bad joint, and test again. Do not backfill a line that only held pressure for a minute.
Air testing is a different hazard. Compressed air in PVC can fail violently. Stay with a water test unless a licensed plumber specifies another method and stays on site for it. If the gauge will not hold and you cannot find the joint, stop and call for help rather than burying the question. The pool plumbing leak repair guide covers how a hidden leak is diagnosed after the fact, which is the outcome this test is meant to avoid.
Book a plumbing inspection if the pressure test will not hold.
Backfill, slope, and the Denver frost line
Backfill with sand or clean soil in layers. Tamp beside the pipe, not on top of a fitting. A shovel of concrete chunks or deck rebar ties dropped into the trench is enough to oval a pipe. Keep valve boxes and any cleanout where a technician can open them without cutting the deck. If a line must pass under a future slab, sleeve it so the slab does not become the clamp that cracks the PVC.
Denver winters are why burial depth and drainage matter as much as the glue. Water left in a shallow line can freeze, expand, and split a fitting. Slope suction and return runs so they can be blown or drained toward a low point you can reach, and do not create a belly that traps water. The planning guide covers the freeze-protection strategy. This install step is only the physical part: no trapped water, no rock against the pipe, and no fitting left under a slab you cannot open.
Neptune Pools closes pools with a line blow-out specifically to limit freeze damage. That seasonal step only works if the pipe you bury today can actually be drained or blown. A line with a sag in the middle holds water no matter how long the compressor runs in October. Fix the slope while the trench is open.
Record what you buried. A simple sketch with lengths, pipe sizes, and fitting locations saves the next repair from becoming a guess. Emergency pool plumbing repair is faster when someone can point to the suction run instead of scanning the whole yard.
Install sequence from open trench to closed deck
Work in this order so a failed joint is still visible. Skipping ahead is how a deck gets cut back open.
- Confirm the fitting spots on the shell and the permit questions for this address.
- Dig and bed the trench. Keep suction, return, and any feature lines identifiable.
- Dry-fit every joint. Check that no bend is forced against the shell.
- Prime, glue, and let the joints cure for the time printed on the cement.
- Plug the shell fittings and run a water pressure test. Repair anything that weeps.
- Backfill with sand in layers. Keep a sketch of sizes, lengths, and valve locations.
- Only then connect the pump, filter, and heater at the pad.
Step 7 is equipment work, not trench work. Unions on the pump, filter, and heater let a technician pull a unit later without cutting buried pipe. If the pad layout is still undecided, leave the buried lines capped and tested rather than guessing the last ten feet.
Above-ground pools are a different job. Their pipe is short, exposed, and usually tied to a pump that sits beside the wall. An in-ground Denver pool hides those runs under soil and deck, which is why the test and the sketch matter more here. If you are only swapping the pump on an above-ground pool, use a pump guide instead of opening a trench.
Where a homeowner should stop
A careful owner can help with trench layout, capping open pipes, and keeping the work area clear. The glued joints, the pressure test, the equipment connections, and anything tied to gas, electric, or a municipal permit belong with a licensed technician. Denver may require a separate plumbing permit on top of the pool's building permit. That is not a detail to skip because the pipe looks done.
Stop and bring in a pro if any of these are true:
- The shell is already gunite, fiberglass, or a lined vinyl pool and a fitting has to move.
- You are tying new pipe into old buried lines and you do not know the size or what shares the run.
- The pressure test drops and a second glued joint still fails.
- The trench crosses a gas, electric, or irrigation line.
- The equipment pad needs a pump, heater, filter, or gas line set and wired.
Neptune Pools has serviced Denver Metro pools since 1982, with equipment repair and remodel work for homeowners, HOAs, and property managers. Weekly cleaning and maintenance is a different job from setting new lines, but a technician can tell you when poor circulation is a plumbing problem rather than a dirty filter. For a leak that is already losing water, start with swimming pool plumbing repair instead of opening a new trench.
Call (303) 431-8501 or use the contact page to schedule a look before the deck goes down. Ask them to see the shell, the open trench, and the equipment pad. Do not send photos of a buried line and expect a pass-fail on glue you can no longer see.
Frequently asked questions
How do you install plumbing for a swimming pool?
Set the shell fittings first, dig a bedded trench, and run separate PVC lines for the main drain, the skimmer, and the returns. Glue and cure the joints, pressure-test with water, then backfill with sand. Connect the equipment only after the buried lines hold pressure.
How deep should pool plumbing be in the ground?
Deep enough to clear the shell footing and the future deck, and deep enough that a Denver freeze is less likely to reach standing water in the pipe. There is no single depth that fits every yard. Slope the run so it can drain or be blown out, and do not leave a belly that traps water.
What plumbing is needed for an inground pool?
You need a main-drain suction line, a separate skimmer suction line, and return lines that split to the wall fittings. Add a dedicated, valved line for a cleaner, spa, or water feature. Each suction line should be isolatable at the equipment pad.
Can you backfill pool pipes the same day you glue them?
Only after the solvent cement has cured for the time on the product label and a water pressure test has held. Backfilling a warm joint, or a joint that never saw a gauge, hides the only chance you have to see a leak.
Does Denver require a permit to plumb a pool?
A permanent pool in Denver needs zoning, sewer-use and drainage, and building permits. The city also says electrical, plumbing, mechanical, or boiler permits may be required depending on the work. Check the address with Community Planning and Development before you bury pipe. Temporary pools that come out at the end of the season are treated differently.
Get the lines right before the deck goes down
A buried pool line is only as good as the test you watched and the backfill you placed by hand. If the scope, the permit, or the pressure test is unclear, pause the trench.
Call (303) 431-8501 to schedule a Denver pool plumbing install review.
Related Blogs

